Fast & Accurate Composite Bond Strength Measurement
Instrumentation
Fast & Accurate Composite Bond Strength Measurement (LAR-TOPS-332)
Nondestructive Test Compatible with Assembly & Repair Facilities
Overview
Innovators at the NASA Langley Research Center, in conjunction with the National Institute of Aerospace and the University of Virginia, have developed a method for evaluation of adhesive bond strength via swept-frequency ultrasonic phase measurements. In recent years, the use of advanced composites has increased as modern designs strive for lighter weight, higher performance, and greater durability. Adhesive bonding is the preferred method of joining composite structures, requiring a nondestructive evaluation (NDE) method for ensuring adequate bonded joint strength. Conventional NDE methods have been used to detect gross bonding defects, but such methods have proven insensitive to weak adhesion. Current NDE methods that claim sensitivity to interfacial bond strength require complex, bulky, and time-intensive measurement procedures that are often not adaptable to the shop floor. NASA's new measurement system quickly and accurately measures interfacial bond strength and is easily compatible with assembly line and repair facilities.
The Technology
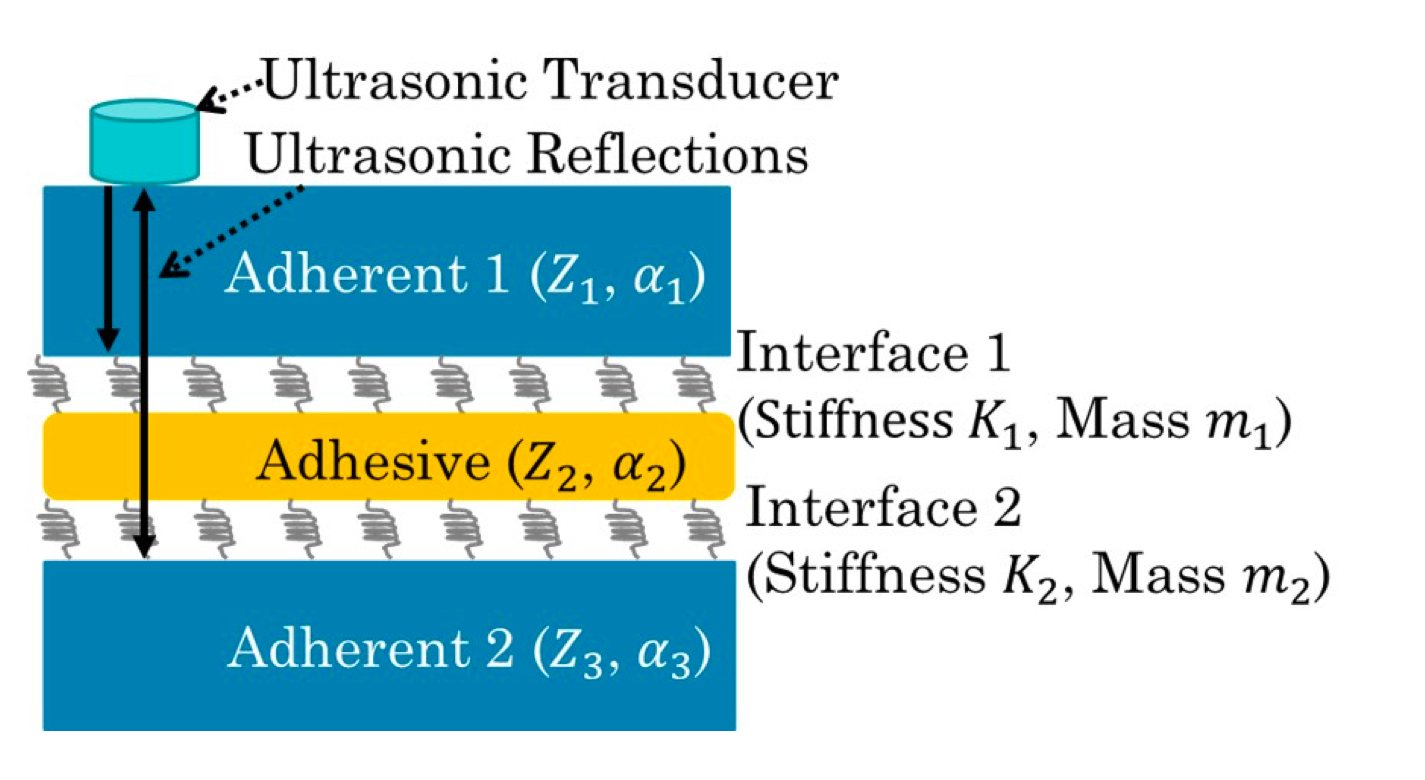
NASA's Method of Evaluating Adhesive Bond Strength is an accurate, robust, quantitative, and nondestructive bond strength measurement method that meets an immediate need in composite manufacturing. Even with careful control of the bonding procedure, destructive testing has shown that bonded joint strength shows substantial variation. Prior art in the field is insensitive to weak interfacial bonding, which leads to poor service life and potential catastrophic failure. Using NASA's method, phase measurements are acquired at a single frequency and then swept to obtain measurements at other frequencies. Narrowband filtering removes extraneous frequencies, which allows for much lower phase measurement uncertainty than other methods. Digital sine wave generation allows for better phase measurement resolution. The resultant system is a phase-based ultrasonic measurement tool for interrogating bonded joints and detecting weak adhesion with superior sensitivity than the state of the art. This new method models adhesive interfaces as a distributed spring system, where the interfacial stiffness constants of the joint can be determined from the zero- crossing frequency of the phase response and the "sharpness" or slope of the phase response. Previous theoretical research has shown that a linear correlation exists between interfacial stiffness constants and mechanically-measured interfacial bond strength. As such, the ultrasonic phase measurement method identifies intermediate bond strengths, rather than simply detecting good or bad bonds. This technique verifies bond quality in metal and composite joint systems, including those commonly found in aerospace, automotive, and many other transportation and infrastructure designs. The demonstrated ultrasonic phase method is applicable to a variety of bonding material systems.


Benefits
- Superior method for interrogating bonded joints and detecting weak adhesion: provides a highly accurate and sensitive NDE method with marked improvements over existing technology that can be used for detecting interfacial bond strength after fabrication, following bonded repairs, and throughout a joint's service life
- Lab tested and verified: proven performance using glass adherends, aluminum adherends, and UV curable adhesives
- Shop and production floor friendly: can be built with COTS transducers, enabling a simple, compact measurement device that takes quick measurements and is compatible with assembly line and repair facilities
Applications
- Aerospace: aircraft manufacturing (e.g., carbon fiber composites for wing and fuselage surfaces bonded together as well as to aluminum air frames)
- Architecture and construction: building construction
- Automotive: composite parts for automobile manufacturing
- Composites: NDE method for measuring adhesive bond strength
- Electronics: printed circuit fabrication
- Marine: ship building
- Semiconductors: semiconductor fabrication
|
Tags:
|
Similar Results

Large Area Structural Damage Nondestructive Evaluation
This technology provides a methodology to measure damage onset and grow at multiple locations in a composite structure during fatigue loading. The thermography inspection is non-contact and can cover very large areas. The acoustic emission sensors require contact at only the sensor attachment points and can cover large areas. The acoustic emission measurement is very sensitive to damage formation events such as matrix cracking, fiber breaks, and delamination, however the event location is approximate. An infrared camera is able to detect damage growth and location at areas of heating (due to fiber breaks, rubbing of disbond areas and matrix cracks) and thus confirm the acoustic emission measurements. If the loading is cyclic the infrared camera is also able to detect the relative depth of the damage. Combining both technologies helps to reduce false indications, confirm damage growth areas and where ultimate failure will occur. This provides a measurement capability to detect growing damage (location and size) for improved structures testing or during in-service applications. Multiple infrared (IR) cameras and multiple acoustic emission sensors can be employed internally or externally for full coverage of the structure. When significant damage growth is detected, the structure can be taken out of service for repair or for further inspections. This technology has been demonstrated for structures testing. In-situ NDE inspections are necessary to provide structural engineers a tool to incrementally control and document damage growth as a function of fatigue cycles before failure. This allows for the comparison of NDE results to develop and validate progressive damage analysis (PDA) models. The ultimate goal is to use the validated PDA models to decrease the time required to certify composite structures and therefore save development costs. Real time NDE can document the progression of damage and provide the documentation of ultimate failure mechanisms.

System for In-situ Defect Detection in Composites During Cure
NASA's System for In-situ Defect (e.g., porosity, fiber waviness) Detection in Composites During Cure consists of an ultrasonic portable automated C-Scan system with an attached ultrasonic contact probe. This scanner is placed inside of an insulated vessel that protects the temperature-sensitive components of the scanner. A liquid nitrogen cooling systems keeps the interior of the vessel below 38°C. A motorized X-Y raster scanner is mounted inside an unsealed cooling container made of porous insulation boards with a cantilever scanning arm protruding out of the cooling container through a slot. The cooling container that houses the X-Y raster scanner is periodically cooled using a liquid nitrogen (LN2) delivery system. Flexible bellows in the slot opening of the box minimize heat transfer between the box and the external autoclave environment. The box and scanning arm are located on a precision cast tool plate. A thin layer of ultrasonic couplant is placed between the transducer and the tool plate. The composite parts are vacuum bagged on the other side of the tool plate and inspected. The scanning system inside of the vessel is connected to the controller outside of the autoclave. The system can provide A-scan, B-scan, and C-scan images of the composite panel at multiple times during the cure process.
The in-situ system provides higher resolution data to find, characterize, and track defects during cure better than other cure monitoring techniques. In addition, this system also shows the through-thickness location of any composite manufacturing defects during cure with real-time localization and tracking. This has been demonstrated for both intentionally introduced porosity (i.e., trapped during layup) as well processing induced porosity (e.g., resulting from uneven pressure distribution on a part). The technology can be used as a non-destructive evaluation system when making composite parts in in an oven or an autoclave, including thermosets, thermoplastics, composite laminates, high-temperature resins, and ceramics.

AERoBOND: Large-scale Composite Manufacturing
This technology (AERoBOND) enables the assembly of large-scale, complex composite structures while maintaining predictable mechanical and material properties. It does so by using a novel barrier-ply technology consisting of an epoxy resin/prepreg material with optimal efficiency, reliability, and performance. The barrier-ply materials prevent excessive mixing between conventional composite precursors and stoichiometrically-offset epoxy precursors during the cure process by forming a gel early in the cure cycle before extensive mixing can occur. The barrier ply is placed between the conventional laminate preform and the stoichiometrically-offset ply or plies placed on the preform surface, thus preventing excessive mass transfer between the three layers during the cure process. In practice, the barrier ply could be combined with the offset ply to be applied as a single, multifunctional surfacing layer enabling unitized assembly of large and complex structures. The AERoBOND method is up to 40% faster than state-of-the-art composite manufacturing methods, allows for large-scale processing of complex structures, eliminates the potential for weak bond failure modes, and produces composites with comparable mechanical properties as compared with those prepared by co-cure.

Advanced Thermal Inspection with Pulsed Light Emitting Diodes (PLED) Technology
NASA’s PLED thermal inspection system consists of an array of high- powered LED chips configured to deliver controlled pulses of visible light. The system includes 8 LED chip arrays, mounted on an aluminum heat sink and housed in a hood configuration. The inspection hood is specially designed with filters to prevent internal reflections. The LEDs are powered by regulated power supplies and controlled via a computer interface that synchronizes heat pulses with an infrared camera. An acrylic filter is placed over the LEDs to block residual infrared radiation, ensuring that only visible light reaches the target surface. The system’s infrared camera, operating in the mid-wave infrared (MWIR) range does not detect the visible light and captures the transient thermal response of the material, allowing for precise defect detection. By eliminating the need for high-intensity broadband infrared sources, the PLED system provides a cleaner and more accurate thermal response, particularly for unpainted metals and additively manufactured (AM) components.
Performance validation of the PLED system has demonstrated significant advantages over traditional flash thermography. In tests on aluminum samples with material loss and AM Ti-6Al-4V metal specimens, the PLED system successfully detected defects with superior contrast and no heat source reflections. Principal Component Analysis (PCA) applied to PLED inspection data revealed clearer defect indications compared to flash-based methods, which introduced unwanted artifacts due to transient reflections. Additionally, the PLED system enabled quantitative thermal diffusivity measurements, offering a new approach to single-sided material characterization.
NASA's PLED thermal inspection technology is available for patent licensing. Potential applications include corrosion detection in aerospace components, quality control of AM metal parts, structural health monitoring of industrial materials, and more.

Enhanced Software Suite Maximizes Non-Destructive Evaluation (NDE) Methods
This technology provides comprehensive, detailed, and accurate NDE detection and characterization of subsurface defects in composites and some metallic hardware. This complete software suite normalizes and calibrates the data, which provides more stable measurements and reduces the occurrence of errors due to the operator and to camera variability.
When using flash IR thermography to evaluate materials, variations in the thermal diffusivity of the material manifest themselves as anomalies in the IR image of the test surface. Post-processing of this raw IR camera data provides highly detailed analysis of the size and characterization of anomalies. The newly incorporated Transient and Lock-In Thermography methods allow the analysis of thicker material and with better flaw resolution than Flash Thermography alone.
The peak contrast and peak contrast time profiles generated through this analysis provide quantitative interpretation of the images, including detailed information about the size and shape of the anomalies. The persistence energy and persistence time profiles provide highly sensitive data for detected anomalies. Peak contrast, peak time, persistence time, and persistence energy measurements also enable monitoring for flaw growth and signal response to flaw size analysis.
This technology is at a technology readiness level (TRL) of 7 (system prototype demonstration in an operational environment), and the innovation is now available for your company to license. Please note that NASA does not manufacture products itself for commercial sale.


